Showing posts with label scalp irritation. Show all posts

Tuesday, May 26, 2015

Going No Poo: 6 Months (Water Only)


In just six short months (okay, they weren't that short), I've finally reached hair nirvana! In Going No Poo: 5 Months, I talked about attempting water only (WO) washes unsuccessfully. Well, I finally figured out the trick: I've been using water from our water filter to combat the hard water!

It struck me one day as I was getting myself a drink of water: we use a water filter on our tap to remove chlorine, fluoride, and other unwanted minerals that affect taste. So why not use it on my hair?

Edit: I recently found out that our Pur water filter doesn't remove fluoride. Bummer!


Well, it worked! I've been very happy with the results over the last month.


How Exactly Do I Do It?

These WO washes were extremely easy! I simply take one of my son's plastic cups, fill it with filtered water from the tap, and take it into the bathroom with me. Next, I lean over the side of the tub and slowly pour the filtered water on my head, making sure to get all of the hair wet. After that, I massage my scalp and run my fingers through the length of my hair. If I'm getting a shower, I turn on the water and get in; otherwise I go about getting ready. I prefer to let my hair air dry or blow dry it on low heat followed by a blast of cool air.


Benefits to WO:


  • I don't need to spend any money on my hair, other than the cost of the filter and the water.
  • I can go WAY longer in between WO washes. Alternatively, there is no harm in using water everyday if I'd like.  


The highlight of my month was when a friend in my leasing office asked if I was still doing the whole No Poo thing, because she couldn't even tell!

I like to think there is a moral to this story: giving up shampoo is not for the faint of heart. However, if this is something you're considering for any number of reasons (maybe you have scalp problems like I did, or maybe you're worried about the nasty chemicals in commercial shampoos), and you aren't too intimidated by the transition process, then I say go for it!

I managed Going No Poo with things that I had on hand and easily accessible ingredients that you can find in any grocery store. Every scalp and head of hair is unique, though, so everybody's journey won't be the same as mine.


I'm a bit sad to say this will be the last post in the Going No Poo series, but I like to think that I'm leaving it off on a happy note. Even though I won't be writing this monthly series anymore, I will certainly update y'all with a new post if there are any surprises in my journey. I wish anybody who begins this journey for themselves the best of luck!

To read more of the Going No Poo series, click here:

Tuesday, February 3, 2015

Going No Poo - Week 12 (& Herbal Hibiscus Rinse)


In the spirit of minimalism, I've decided to minimize my stress and workload by making the Going No Poo series a monthly post rather than a weekly one. To be honest my scalp is so normalized that there isn't really anything new going on.

One of my main goals when starting this blog was to help others feel beautiful naturally, without having to conform to societies mainstream notion of what beauty is. I can honestly say that after three months without commercial shampoo, my perspective on hair has changed quite a bit. For example, my hair looked somewhat oily yesterday, and rather than think it was "gross," I thought: "my hair is softer than the the softest puppy I've ever felt!" Yes, that was my exact thought. I hope this blog inspires even one other person to feel the same way, rather than worry about what everybody else will think.

My monthly No Poo progress.
Check out those natural waves happening!

One thing that I have noticed is that my hair does not like to settle into a routine. As soon as I find something that works wonderfully, my hair decides it's time to switch it up. For the last few weeks, I've been alternating between an apple cider vinegar rinse and a coffee/herbal tea rinse. I've finally gotten my tea rinse to the perfect ratios (for me), so here it is:

Herbal Hibiscus Rinse


For my herbal tea rinse, I simply mix all of the ingredients together and pour it over my head. Applying this rinse over the sink (onto dry hair*) is the easiest method for me. I put a large mixing bowl in the sink to catch most of what I pour over my head, that way a little rinse goes a long way.

I also add a drizzle of honey occasionally (about a teaspoon), particularly if any irritation pops up (like during the winter months).

*I apply the mixture to dry hair, rather than wet, because of hard water issues. 

For the Hibiscus Tea:

I boiled 2 hibiscus tea bags in 1 cup of water for 5 minutes, and then let it steep for about 30 more minutes. Mine reduced to a 1/2 cup by the time all the boiling/steeping was done, but you can save the leftovers in the fridge if you wind up with more than half a cup.

For the Rosemary/Ginger Tea:

I boiled a fresh piece of ginger (about an inch long), 2 tablespoons of dried rosemary, and a teaspoon of ground turmeric in about 2 cups of water for 5 minutes, and then let it steep for 30 minutes. Since this herbal tea has loose herbs, it's best to strain with a coffee filter before using. As with the hibiscus tea, you can store the leftovers in the fridge.

Strongly brewed coffee can be used in place of espresso. 


Behold my healthy scalp, free of irritation and/or dandruff!


To read about the rest of my journey, click here:

Sunday, January 11, 2015

Going No Poo - Week 9 (& Honey/Coconut Oil Mask for Dry Scalp)


How is everybody fairing during these winter months? This back-and-fourth, Florida weather is driving me a bit crazy. I know I should't complain, because some people are in the teens and twenties! It just bothers me that Florida can't make up it's mind. Seriously, how can it be 90 degrees one day and 60 degrees the next? Okay, I'm done complaining...

With the winter months comes dry scalp for a lot of people. It even got me this winter, here in Florida! I did another Moisturizing Honey Mask to soothe my dry, irritated scalp, but this one was just a bit different from my last one.

For this mask I used only 3 ingredients: honey, water, and coconut oil.


Honey/Coconut Oil Mask for Dry Scalp


  • 2 Tbsp Raw Honey
  • 1 Tbsp Water
  • 1/8 tsp Coconut Oil

Directions


  1. Mix all the ingredients together. 
  2. Apply the mask to the scalp, and work through to the ends of the hair. You may need to double the recipe if you have long hair. Using a squirt bottle (like a hair dye applicator) makes the process a lot easier, as does standing over the sink. 
  3. Wrap hair with an old, clean T-shirt or a shower cap, and leave the mask on for at least 30 minutes. The longer you leave it on, the better it soothes and heals scalp irritation. 
  4. Rinse with water. You can follow up with an apple cider vinegar (ACV) rinse if you'd like, but it's completely optional.


Success! This Mask did exactly what it was meant to do: soothed and
healed my scalp irritation without leaving my hair oily.


What else is new this week?

I finally got around to trying a hibiscus tea rinse! You may remember me mentioning hibiscus tea in my post about Herbal Tea Rinses. In case you don't, it is great for auburn/red hair and for bringing out natural red tones. I don't really have auburn hair anymore, but part of me hopped for reddish tones after using it. There haven't been any noticeable changes after 2 applications, although it does smell great! I'm still using my espresso rinses as well - in fact, I even mixed it with the hibiscus tea to produce a darker red.


Good "hair days" are a lot more common these days than they used to be. Even my bad hair days aren't really that bad. For comparison, I've posted a picture of the best hair day I've had this week along with a picture of the worst. Even at my worst, I didn't feel gross or greasy. I even went out with a friend... in public! *gasp*


To read about the rest of my journey, click here:

Sunday, January 4, 2015

Going No Poo - Week 8 (Children & No Poo)


It's been 2 months since I've used commercial shampoo! I love to bring it up in conversation, and watch the expression on people's faces go from disgust to curiosity, and then to amazement at the fact that my hair looks, feels, and smells clean (yes, I do encourage touching and smelling).

I'm still using an espresso rinse, usually with some whey and rosemary/ginger herbal tea mixed in. I sometimes add a drizzle of honey as well. Right now I'm rinsing every other day. I may try experimenting with some other rinses soon, but for now I'm happy with my current routine!


Children & No Poo

My 5 year old son has been No Poo for about as long as I have, give or take a week. He's pretty much water only (WO), with an occasional apple juice rinse. That's the only thing he'll let me put on his head other than water, but he's come to love it - and even request it! It might have something to do with me allowing him to squirt the leftovers in his mouth and drink it after...


Look at his beautiful, shiny hair and healthy scalp!

If you're a parent already, you may know that washing a child's hair everyday is completely unnecessary, and can actually dry their scalp out. Before making the switch to No Poo myself, I was only washing my 5 year old's hair about once a week. After I stopped using all those yucky, chemical-laden shampoos on my hair, how could I go and slather it on his head? That's when we decided to ditch the 'poo for him as well! 

He has short hair and he doesn't sweat very much yet, so WO was the route we went with him. His short hair and healthy scalp made the switch a breeze; he didn't even go through any transition! 

I'd never force him to put anything on his hair that he didn't want to, so I started making suggestions about possible rinses we could use on him. Apple juice came up and he liked the sound of it! He really doesn't need the apple juice for his hair... it's more of a special treat for him. We dilute it to a ratio of 1 part apple juice to 1 part warm water (warm or room temperature water feels better going on than cold).


Why Apple Juice?

While raw apple juice is ideal, we simply used the processed stuff because it's all we had. Bonus points if you own a juicer and can extract the juice from your own apples!

  • Dandruff remedy - although my son doesn't have any dandruff problems, apple juice does contain malic acid and amylase, which help to exfoliate and remove dead skin and dandruff flakes (Source: hair buddha).
  • Soft, lustrous hair - much like apple cider vinegar (ACV), the acidity of apple juice helps remove product buildup and residue, helps distribute the sebum down the length of the hair shaft, and closes the cuticle (leaving hair shinier). 
  • Balances & maintains pH - the natural pH of the scalp is between 4.5 and 5.5 (which is acidic) and the pH of apple juice is between 3.3 and 4. Since the apple juice pH is so similar to our scalp (as opposed to commercial shampoos), it helps to maintain the natural acidic pH which hinders the growth of bacteria and fungus (Source: hair buddha & pH Values of Common Foods and Ingredients).


Benefits of No Poo

  • Softer hair - my son's hair is now unbelievably soft and silky. I honestly can't help myself sometimes... I love to touch and smell his hair.
  • Clear scalp - I didn't even realize that scalp irritation was a problem for my son until the switch. He'd never let me run my fingers through his hair before; he always said "ouchy," but I figured he just didn't want Mommy touching his hair. Since giving up shampoo, touching his scalp or hair isn't a problem. The first time he let me touch it without protesting I asked him if touching his head hurt anymore, and thankfully the answer was no. He loves his hair touched and scalp rubbed now!


Happy New Year from the No Poo Hippy Family!


To read about the rest of my journey, click here:
Going No Poo

Saturday, December 27, 2014

Going No Poo - Weeks 6 & 7


I've been pretty busy with the 7 Days of Christmas, so I was pretty late getting to Week 6. The week was already almost over by the time I got any free time, so I figured I'd just combine Weeks 6 & 7.


Giving Up Honey

I seriously LOVE honey. I love it! Have I said that enough yet? Despite my love-affair with honey, I actually haven't washed with it since Week 4 (well, maybe a drizzle in my rinses here and there). It doesn't mean that I don't love honey anymore (I swear, I do!), it was just time to switch things up! I felt like my hair was getting too weighted down, and I also felt like I could stretch out the days between washes a bit more. I decided to finally try out an espresso rinse in Week 5, and LOVED it!

Can you see the difference in body? The espresso enhances my curls as well!


I did use a honey mask after a failed experiment left me with some scalp irritation. Read Trial & Error below for more details.


What Am I Using Now?

Since I recently made some homemade yogurt, I had plenty of whey leftover (a byproduct of yogurt). I tried a whey rinse back before I made the switch to No Poo, and I loved it then. I had espresso, I had whey, and somehow they ended up together in my hair. It was awesome, and the smell was delicious! My favorite part was that it was the closest to a lather I've gotten since going No Poo! The whey has a bit of a thickness to it, and that's what sort of feels like it's lathering up. I've also been experimenting with adding a ginger/rosemary tea to the mix (simply ginger and rosemary boiled in water and steeped for about 20 minutes). I usually leave it in for a while, but it works pretty well as a quick rinse too. This is just a personal preference, but I like to apply the espresso/whey mixture over the kitchen sink, then wrap my hair in an old, clean T-shirt and allow it to dry before rinsing it out with water.

Acid rinses (like apple cider vinegar, certain teas, and coffee) are not technically washes; they're considered a conditioner, so you can use them daily if your hair responds well to it.


Since the Switch

Since I've quit using a honey wash every week, and have switched to acid only (AO) rinses (espresso and whey, specifically), my hair has had so much more body! My hair loves espresso! I usually do them every other day, but they are fine to daily as well.


Trial & Error

One thing I sometimes miss about shampoo is the smell. My hair doesn't smell bad at all; it just doesn't have a smell. Sometimes I miss that freshly shampoo'd smell (think flowers or fruit), although not enough to actually use any. I decided to try a little scent experiment with vanilla extract. I don't have any EOs (essential oils, for you EO virgins like me), but I have seen vanilla extract in some DIY recipes (for lotion or soap perhaps). Well for those of you who don't know, most vanilla extracts are made with alcohol and sugar or corn syrup. Although alcohol is found in many commercial shampoos (why?), it's extremely drying. After going this long without commercial shampoo, even 10 drops of vanilla extract was enough to inflame the scalp irritation that going no poo helped get rid of. The irritation was bad enough for me to use a honey mask the next day, which helped immensely. Lesson learned: don't use vanilla extract on my hair.

Some people like to leave their conditioning rinses in, and I though it would be great to try with espresso! Wrong. It left brown marks on my hands anytime I ran my fingers through my hair. It also left my hair feeling a bit stiff... I'm not sure that's the right way to describe it, but I can't think of a better word for how my hair felt. I'm going to stick with rinsing the espresso out. 


Unexpected Benefits of Going No Poo


  • Stronger nails - since giving up shampoo I've noticed that my nails have gotten stronger, but especially since using my orange/rosemary herbal tea rinse on my hair; just the act of rubbing it into my scalp was enough to strengthen them. I wish I had a before and after picture to show you. My nails usually break off right above the pink, but in the last few weeks, they've gotten unbelievably strong! Since I don't use the herbal tea rinse anymore, I'd like to incorporate it into a nail care routine. 
  • New hair growth - believe it or not, those little hairs I circled below are actually new growth! I attribute it to the rosemary in the rinses I've been using (rosemary is great at strengthening hair and even promoting new growth), along with the fact that I haven't been using any harsh chemicals on my hair or scalp!
    I'm sure these little hairs are new growth and not breakage for a few reasons:
    1) I haven't been doing anything to cause split ends (tying my hair up, using harsh chemicals, brushing too hard and/or too often).
    2) I examined them to make sure there were no frayed or stressed ends. 

For more information on breakage and new growth, check out Hairfinder.com.


The most important thing I've learned from all of this is to experiment! Every wash or rinse you try won't work for you, but when you come across what does work for your hair you'll be over the moon. I thought I had found what worked for me with honey, but if I didn't experiment with new wash methods I wouldn't have found this better working one!


To read about the rest of my journey, click here: 

Thursday, December 4, 2014

Herbal Tea Rinse: Customize It For Any Hair Type!


Here in the South, we LOVE our sweet tea! I'm from Florida, and tea is something that most people around here have on hand, so I decided to experiment with it. I love the idea of an herbal tea rinse, because it's double duty: you can make a drink and a hair rinse with the same set of tea bags! Since I was running low on my apple cider vinegar (ACV) rinse anyway, I decided it was the perfect time to try it! I've read a lot about how different teas can be used as acid rinses (sort of like ACV, which is an acid rinse). They can even be added to your ACV rinse; that's what I did! Adding herbs to your tea while it's brewing brings a little something extra to the table, depending which herbs you use.

Different herbs benefit different hair types, as do different teas (and coffee!), and that is what makes this tea rinse customizable: you can make it using the ideal tea and herbs for your hair type! I'll list some of the most common herbs and teas, and which hair type they benefit. First, I'll give you the rundown on the herbal tea that I made specifically for my hair: Herbal Oolong Tea Rinse.

My Herbal Tea Rinse:

For my herbal tea rinse, I brewed up some oolong tea that I happened to have sitting around since ordering Chinese takeout. I also threw in some mandarin orange peels and rosemary. I mixed the (cooled) herbal tea in with my diluted ACV rinse. However, I later learned that my hair prefers the tea diluted: about 1 part oolong tea to 3 parts water (read on for more details about diluting the tea).

If you prefer to get more bang for your buck, you can brew the tea bag per the normal directions for drinking. After your tea is brewed, remove the tea bag and boil it again for your hair rinse! If you're using this method, it may be best to brew the tea and orange peels/herbs separately (as I describe below) so that they don't interfere with the flavor of the tea. Although I have seen suggestions for brewing sweet tea with orange peels for a citrus flavor, so who knows!

But why did I choose these particular ingredients, and what are their benefits?

  • Oolong Tea - the high level of antioxidants in oolong tea prevents hair loss. Oolong tea also softens hair, while adding shine and luster.
  • Orange Peel - due to their anti-inflammatory properties, orange peels make a great dandruff remedy. Orange peels are also great for reducing oil. (They also smell great!)
  • Rosemary - it stimulates the follicles, causing hair to grow longer and stronger, and is believed to slow premature hair loss and the graying of hair (Source: Organic Facts). Ideal for dark hair.

The cookie is for eating while your tea is brewing!


Method/Results:

I brewed all three ingredients in 1 cup of water for about 5 minutes, and then allowed the tea to cool. After it was cool, I strained it (cheesecloth or a coffee filter may be required), and added it to my ACV rinse. However, the undiluted rinse left my hair stringy and greasy-looking after 2 days. That's unusual for me now; I can make it at least 4 days without looking too oily. I didn't want to give up this experiment after one little hiccup, so I decided to try diluting the oolong rinse I'd already made (my ratio was about 1 part oolong tea to 3 parts water), and that did the trick! I'm so glad I stuck with it!


I brewed orange peels and rosemary in water to dilute my
oolong tea with, since the undiluted tea left my hair oily.

After discovering that my hair preferred the tea rinse diluted, I decided to boil the orange peels and rosemary in water, and dilute the oolong tea with the orange/rosemary water. I did this so that the orange/rosemary smell wouldn't be weakened, but you can boil them all together if you find that easier. 

This time I boiled the orange peels and rosemary in 2 cups of water for about 10 minutes, allowed it to cool, and strained it. I steeped the oolong tea bag in 1 cup of boiling water for about 20 minutes (I actually lost track of time, but it was at least that long), and mixed it with the strained orange/rosemary water.

When I first tried this oolong tea/ACV rinse last week (read about it here: Going No Poo - Week 3), I loved the smell but had to do some more experimenting to figure it out. So remember: this no poo thing is NOT one-size-fits-all; experiment and figure out what works for you.

I want to clarify that this herbal tea is what works for me. Every individual is different, so my method may not work for the next person. I'm simply sharing my experiences as I go, and I'm in no way an expert.


Customize your tea with other options!


Teas:

  • Green Tea - (can be used on light or dark hair) prevents and treats dandruff and psoriasis, stimulates hair growth, softens hair, and adds luster (Source: STYLECRAZE)
  • Oolong Tea - (can be used on light or dark hair) prevents hair loss and shedding, softens hair, and adds shine and luster (Source: STYLECRAZE)
  • Black Tea - (dark hair only) increases hair thickness, fights hair loss and stimulates hair growth, darkens grays, and brings out natural highlights. It also adds shine, luster and natural darkness (Source: STYLECRAZE)
  • Coffee - (dark hair only) adds luster and more intensive tone to brown hair, stimulates hair growth, conditions, and adds natural shine (Source: STYLECRAZE)

 Herbs (by hair type & benefit):


All-Purpose:
  • basil
  • fennel seed
  • peppermint
  • rosemary
  • sage
Dark Hair:
  • cloves
  • rosemary
  • sage
Light Hair:
  • chamomile flowers
Revitalizing:
  • basil
  • ginger root
  • marjoram
  • peppermint
  • rosemary
Dry Hair:
  • burdock root
  • sage
Oily Hair:
  • lemon peel
  • orange peel
  • lemon grass
  • peppermint
  • rosemary
Auburn/Red Hair:
·         hibiscus

Conditioning:
  • burdock root
  • catnip
  • lemongrass
  • rosemary
There are many more herbs with benefits to different types of hair, however I only listed the most common. (Source: Frontier CO-OP)

Try creating your own unique herbal tea rinse! You can even experiment with different rinses to create more than one! For example: one for oily days and one to help with scalp irritation...

Please comment and share the herbal tea rinse you create!


Friday, November 21, 2014

Going No Poo - Week 2 (& Moisturizing Honey Mask for Split Ends)


Welcome to Week 2 of my no poo journey! Last week I left off on Day 8 (Monday). If you haven't read about my first week going no poo, check out Week 1!

So far so good this week, but it's still only Wednesday (Day 10). I've also been warned by fellow no poo peers (try saying that 10 times fast!) that sometimes "transition hair" doesn't kick in until Week 2 or 3! So now is the time to be wary... I'll keep y'all updated though.

I'm still using the honey washes as my no poo method, although my last honey mask/wash was 4 days ago. My scalp and hair still feel good, and I feel like I could probably go 2 more days without washing with honey. The oil is sitting at my roots a bit, so I think I'll definitely need a water only wash tonight to help distribute that sebum (maybe even a apple cider vinegar rinse). I've noticed that the hair around my face gets oily first, probably from touching it and pushing it out of my face so much. I did get a tip from somebody in my Facebook group though: if my hair starts to get waxy (from a buildup of sebum, products, or hard water), an applesauce mask will help! They made sure to tell me that only sugar-free applesauce  will do (baby food or homemade would work also). Sugar can have a bad affect on the hair and scalp.

I did notice some split ends where there is still color in my hair (I chopped as much off as I could 2 months ago, but there's still a bit of color on the ends). That means I will definitely need a trim soon, and I'm certainly interested in hearing what my stylist thinks about all of this.

No funky smells either! My hair just smells like clean hair. Not the kind of perfume/flowery-clean that you may be used to, but there is definitely no stink.

****************************************

It's Thursday (Day 11) now, and my hair is still looking great other than some split ends. I found out the hard way not to brush with a boar bristle brush while the hair is wet; apparently the hair is very weak while wet, and brushing with anything other than your fingers or a wide-tooth comb can stretch and tug hair leading to breakage and split ends. Lesson learned. Hopefully a honey mask tonight will help tame them until I get a trim in a couple of weeks. I'm also avoiding brushing as much as possible until then, using my fingers instead.
After my ACV rinse last night (Day 10).
It's clean, but look at those split ends!
Other than some split ends from rough brushing, my hair is looking great! It's clean and soft, and not at all what you'd expect hair that hasn't been washed in 10 days to look like!
****************************************
Today is Friday (Day 12), and I'm very happy with my hair today! I used a honey mask last night to try to smooth my split ends and moisturize my hair, but it was a little different than I normally use. Rather than slather on honey alone, I added a little bit of hot water (just enough to thin out the consistency a tiny bit; I didn't measure, but if I had to guess a ratio I'd say 1 part water to 2 or 3 parts honey), a dollop of Greek yogurt (for protein), and a few drops of extra virgin olive oil (to soothe those split ends). I was VERY careful not to add too much oil though! I once had a bad experience with an olive oil hair mask; I looked like a grease ball for a whole day! I put all of the ingredients into a jar with a lid and shook, shook, shook! It really doesn't take much shaking to mix together though.
I left this mask on for 2 hours (I probably would have left it on longer, but it was getting too late), and rinsed very thoroughly with warm water. I followed that up with 2 apple cider vinegar rinses (one would've sufficed, I'm sure. I was just paranoid about my hair looking too oily).
My homemade honey mask/shampoo!
A little goes a long way.

Moisturizing Honey Mask/Wash for Split Ends:

  • about 1/8 RAW honey*
  • dollop of PLAIN Greek yogurt
  • 2-3 drops of extra virgin olive oil
  • water, just enough to thin out the consistency
*1/8 cup of honey is an estimate. Use more or less depending on how long/thick your hair is.

Mix ingredients in a jar or container with a lid by shaking or stirring. Apply to wet hair, massaging into the scalp. (I did this part standing in the shower. This mask is thinner than what I normally use, so it drips quite a bit.) Leave in for as long as you can (at least 30 minutes!), and rinse thoroughly with warm water (not too hot, because the heat can make split ends worse). Follow with an apple cider vinegar rinse (1 part ACV: 3 or 4 parts water). Allow hair to air dry.
It's important to note that this is a pretty messy treatment, so a little bit goes a long way. It's definitely necessary to use a shower cap or wrap your hair up with an old, clean t-shirt (that's what I used). Try to remember there is no other way to fix split ends other than cutting them off. This is simply meant to be a temporary fix until you're able to get a trim.


Wow, look at that difference! You can still see some split ends, but most of them are tamed for now.
I mentioned that I was worried about the extra virgin olive oil leaving my hair greasy, but it didn't at all! In fact, I think I'm going to incorporate this new mask into my routine about once a month.

Breakdown of my no poo week:

  • Day 9 (Tuesday) - 3 days since last honey wash. Hair is still soft and smells nice, but there's a bit of oil at the roots.
  • Day 10 (Wednesday) - "Washed" with my apple cider vinegar rinse, air dried, and finger combed. I noticed a lot of split ends.
  • Day 11 (Thursday) - Moisturizing honey mask to smooth split ends. Worked very well, without leaving hair oily!
  • Day 12 (Friday) - Another good hair day! My split ends are tamed for now, and my hair feels wonderful!
  • Day 12 (Saturday) - My hair looks and feels great, but I did notice a couple of pimples in my scalp. I'll definitely keep an eye on that.
  • Day 13 (Sunday) - I'm not sure what caused the pimples, but one honey mask (with some yogurt and lemon) took care of them.
  • Day 14 (Monday) - Today is a good hair day, other than feeling like I need a haircut. My short, layered 'do is in need of an update.

Unexpected benefits of no poo:

  • When I used commercial shampoos, before making the switch, I shed A LOT of hair. I usually noticed it most in the shower; after shampooing my hands would be covered in hair! Sadly I came to accept this as the norm. However, last night in the shower there were maybe 2 strands of hair on my fingers after my apple cider vinegar rinse! That's the first time since I was a teen that I haven't shed a handful of hair after a wash!
  • Little did I know that honey contains an enzyme (glucose oxidase) that produces hydrogen peroxide. Does anybody know what hydrogen peroxide does to hair? Yep, it lightens it! Seriously, what can't honey do?! I feel like my greys have become less noticeable because of this, but they may just be all in my head (ha-ha, get it?). Even if that isn't the case, I've noticed the rest of my hair turning a lovely red that I'm really digging.
    For more info on lightening hair with honey and other natural alternatives, check out this blog post From Living the Nourished Life: How to Naturally Lighten Hair
11/16/14: After 2nd honey mask
11/21/14: After 3rd honey mask
I know that seems like a big difference for one mask, because I thought so too. It turns out that the enzyme in honey that produces hydrogen peroxide increases by a factor of up to 50,000 when diluted with water (Source: Honey can be Used for a Variety of Medicinal Purposes). So basically it lightens a lot better when mixed with water, and that's exactly what I did with my moisturizing honey mask!


Stay tuned for Week 3, which will include some ideas for "transition hair," and what to do when your hair looks to oily to wear down. Also, please feel free to comment with questions, suggestions, or even your own no poo story!


Tuesday, November 18, 2014

Going No Poo - Week 1


 Hi, and welcome to my first ever blog post! Today I'm going to dive right into the whole reason I started this blog: "no poo." I know what you're thinking, because every person I mentioned it to thought the same thing - "Does it mean you're constipated?" Nope, but I see where the confusion comes from! "No poo" is actually an abbreviation for "no shampoo," which basically means ditching commercial shampoos that contain damaging sulfates, parabens, or silicones. Using a shampoo that is free of these chemicals is considered "low poo," while opting for an alternative washing method is considered "no poo." There are several different no poo methods (baking soda and apple cider vinegar, water only, acid only, sebum only), but first I will explain some of my reasons for ditching the 'poo.

Please keep in mind that I am by no means an expert. I'm only sharing my personal experience with no poo, and it's all still a learning experience for me. You should also keep in mind that each individual's scalp and hair is unique and responds to no poo methods differently. Many factors such as age, region, climate, and even hormones can affect your hair.


Reason #1: Scalp Irritation

Over the past five years, I developed a terrible case of scalp irritation! It took me that long to even realize that it was a combination of my shampoo and hard water. This is hands-down the biggest reason for my switch. I had little red pimples in my scalp that were incredibly painful. I tried parting my hair different ways to avoid the pimples, pulling my hair back, leaving it down, olive oil masks, switching up how often I shampooed, cutting my hair so it'd be lighter... no matter what I tried, my head and scalp hurt. It seemed like even my hair hurt sometimes, and I was ready to chop it all off - which I ended up doing. It took me a long time to realize the cause, because my head was fine until we moved into our current apartment which has hard water (water that has high mineral content, such as limestone, chalk and dolomite). In fact, I just recently (like in the last 2 days) found out that minerals in hard water actually interfere with the "soap" (saponification, if you wanna get technical) in your shampoo (as well as certain no poo methods that involve saponification; baking soda, Castile soap, and shampoo bars, for example), leaving the soap, dirt, and minerals all in your hair and scalp. I'm now happy to say that eight days into my no poo journey, my irritation is completely gone!

Reason #2: More Money and Time

 Since my scalp irritation became unbearable, I'd been searching for ways to fix it, and most of them cost money. At times I thought my hair was too heavy, so I tried haircuts. I also tried buying new shampoos that claimed to be safe. It felt as if I were throwing my money away though! I was also washing my hair at least every other day, using more water than I needed to. Once I quit using commercial shampoos that strip my hair of it's natural oils (leading my scalp to go into overdrive and produce more oil, leading to another wash, leading to more oil...see a pattern?), my hair and scalp adjusted to it's normal oil (or sebum) production and I was able to wash less frequently. Less washing = less water and shampoo used (or whatever your alternative is), which means less money spent and more free time!


Reason #3: Healthier, Luxurious Hair

I know this sounds a little crazy, right? Healthier hair with no shampoo? It's definitely true, and I have first-hand experience! Most people go through an awkward "transitional period" when their hair is adjusting to no poo (although I didn't!), but after it's back to normal you should have gorgeous locks! I'm currently on day 8 without commercial shampoo, and my hair is amazing right now!
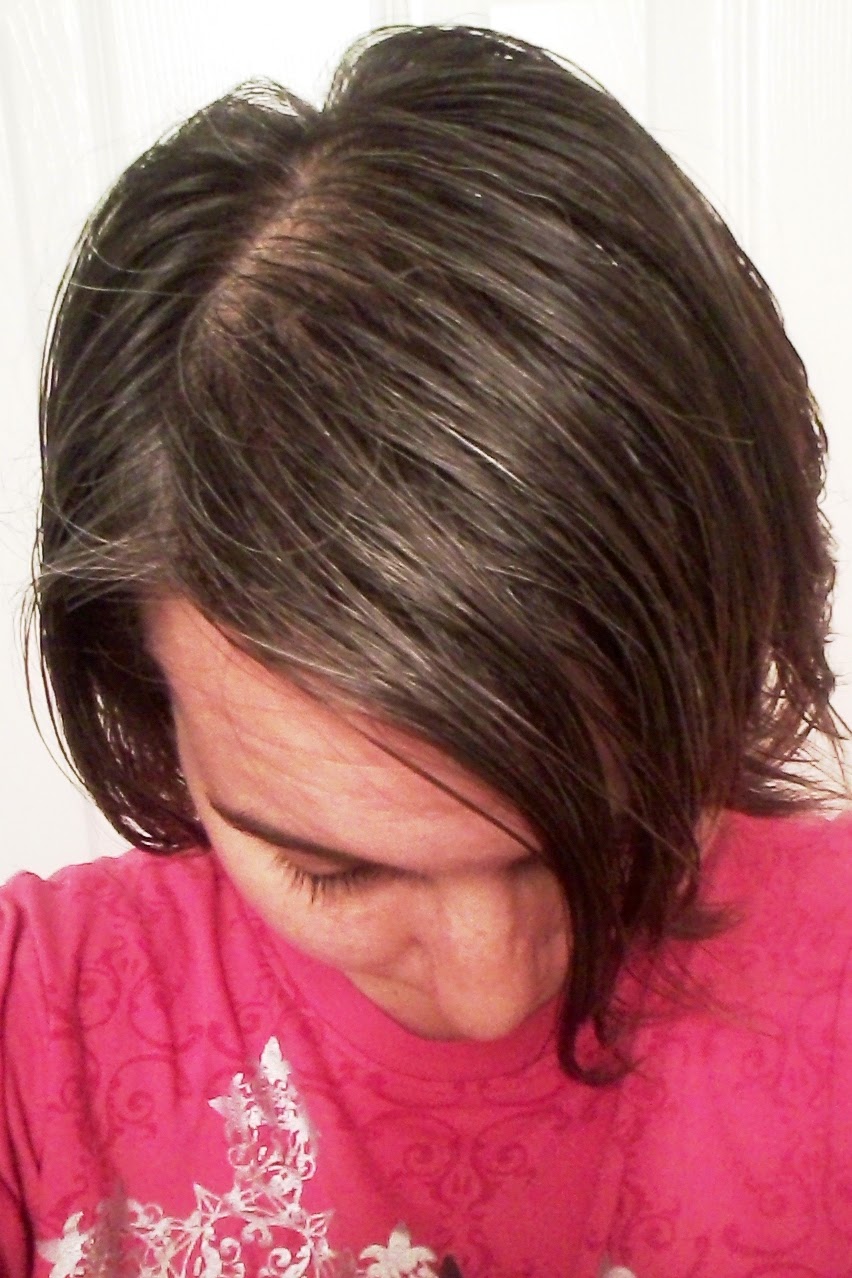

No Poo: Before and After
Before: 4 days before my last commercial shampoo
After: 8 days after my last commercial shampoo
I know it doesn't look like there's much difference in these two photos (please forgive my poor photography skills), but consider that the second photo is 7 days since washing my hair! Now take a closer look. Can you see the difference in oiliness and volume? That first picture is a freshly washed head of hair, yet it looks limp and weighted with oil compared to the second photo. My hair has actually regained some curl as well! My hair went completely lifeless after I got pregnant with my son 6 years ago, and hadn't held a curl since (no matter how much hairspray I used!)

Reason #4: Less Chemicals

This is another important reason to me (and the main reason I consider myself a modern day hippy)! I'm trying to cut all of the toxic chemicals out of my life, making little changes for the better when I can.
Commercial shampoos (as well as toothpastes, deodorants, moisturizers, and more) are linked to all kinds of nasty things; here are a few articles:
I quit dying my hair, and started embracing my grays, partially for this reason. (I was also tired of feeling like a slave to dye. "Oh no, look at my roots! I better dye before work/school/my date/being seen in public..." Sound familiar? That's a post for a whole other day though.)


Do you have any scalp problems, or do you feel that you're spending to much time and money on your hair? Want to simplify your routine or cut out toxins? What are your reasons for considering no poo, if at all?


No Poo Methods:

Thanks to the awesome No Poo (No Shampoo) & Low Poo group on Facebook that I'm part of, I've learned about several different methods, but I will only describe some of the most popular and my own method for now.

  • Baking Soda and Apple Cider Vinegar

There are many different no poo methods, but the most popular one is baking soda (to wash) and apple cider vinegar (to condition). After a lot of research and reading other people's experiences, I decided not to try this method. Not that it's a bad method, I just wanted to try something gentler because of my scalp problems. I'm unsure of the exact amounts, but it usually consists of mixing baking soda with water for your "shampoo" and diluting apple cider vinegar with water as your "conditioner." (Side note: I actually used an ACV rinse instead of conditioner while I was still using commercial shampoos. It works wonderfully as a conditioner as long as it's diluted enough.) Do not use this method more than once every 4 days though!

  • Egg Wash

Another popular no poo method is egg: either the white, the yolk, or the whole egg
The yolk and white are both okay to use once a week (although that can be too much protein for your hair; too much protein leads to stiff hair and breakage), while the whole egg is not recommended more than once a month. Be sure to rinse with cold to luke-warm water or you'll wind up with scrambled eggs in your hair though!

  • Water Only, Acid Only, and Sebum Only

The names of these methods are a bit telling. Water only means only using water to wash your hair. Acid only consists of washing your hair with a diluted acidic rinses such as white vinegar, apple cider vinegar, lemon juice, or any other acidic rinse (although these are technically considered "conditioners," they are used to help distribute the sebum down the length of the hair). Sebum only is probably the most hardcore of the no poo methods! It means no water or washing of any kind (referred to the "caveman" method in my no poo group on Facebook), and simply using a special brush or your fingers to distribute the sebum to the rest of your hair.

  • Honey/Aloe

As far as I can tell from the experiences of others, honey and aloe work in very much the same way on the hair (however, I've only ever tried honey). Although technically considered a "conditioner," honey or aloe may be used to "wash" the hair. More to the point, they are particularly useful against a dry, itchy, or irritated scalp. They can be used to wash more often than harsher methods, such as baking soda, since they don't strip very much sebum, and they leave your scalp and hair feeling amazing!

  • Dry Shampoo

Although dry shampoo can be store bought, there are usually a multitude of ingredients; and it's often hard to tell which are safe. If the reason you're starting no poo is for less toxins (or to save money!), you may want to consider making your own dry shampoo. It's so easy you won't even need to write it down! Ready? Grab some cornstarch. sprinkle some in your hands and apply it to your hair, near the roots (where the excess oil is). Shake off the excess powder, and voilĂ  - all done! If you have darker hair like me you can add some cocoa powder for color, although I've done it with plain cornstarch before, and it's not very noticeable as long as your shake off the loose powder.


For more info about different no poo methods, check out this link (or do some of your own research):
Top 5 “No Poo” Shampoo Alternatives 


My Experience/Method:

As I mentioned already, every scalp and head of hair is different. Factors that can affect your scalp are: age, region, climate, and even hormones. Before I describe the method I found to be most effective, I'll tell you a bit about myself. I'm 25 years old, and a Florida-native. I became pregnant with my first and only child at the age of 19, six years ago, and gave birth to him in 2009. I have short, average (not thin, but not too thick) hair that tended toward oily while I was using commercial shampoo.

My whole no poo journey started with researching a home remedy for the scalp irritation I felt, and I came across honey! More specifically, honey masks/washes. I already hadn't washed my hair in two days, but this wasn't planned. If someone told me I wasn't going to shampoo my hair for a week the day before I tried honey, I probably would've laughed at them and imagined a rat's nest. I read to leave it on for about 30 minutes, but I'm scatterbrained so I ended up leaving it on for closer to an hour. The good news is that it doesn't matter! In fact, the longer you leave it on the more it helps your scalp! I took some honey and rubbed it onto my hair, massaging it into my scalp. (Tip: Wet your hair first! I learned the hard way that sticky honey + dry hair = painful pulling! Also a shower cap would come in handy to avoid messiness.) Some people dilute the honey, but I found that wet hair and hands makes it easy to spread and rub in. I actually threw in a dollop of Greek yogurt for protein and a splash of lemon juice.

After waiting about an hour to rinse the honey (I got caught up cleaning and cooking, so I lost track of time), and using an apple cider vinegar rinse, my hair felt AMAZING! It was soft, shiny, and clean! My scalp irritation was almost completely gone after the first use as well!


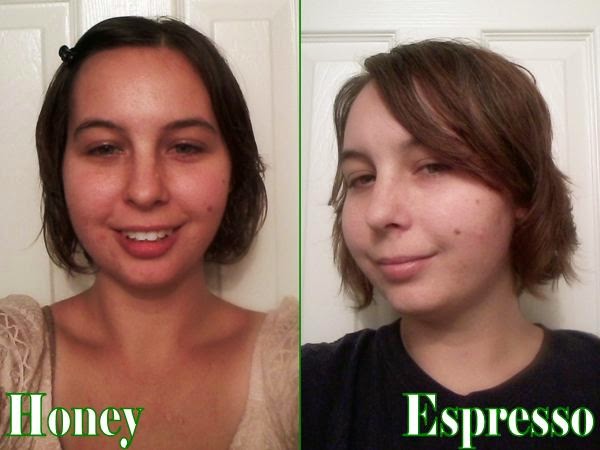
Sorry about the closet selfie!

Just look at how clean and shiny it looks after my first honey wash! If only you could run your fingers through and feel how soft it is! After that I decided I was never going back to commercial shampoo!

Allow me to give you a breakdown of my first week no poo:

  • Day 1 (Monday) - Last commercial shampoo EVER!
  • Day 2 (Tuesday) - Scalp irritation is driving me crazy!
  • Day 3 (Wednesday) - Honey mask/wash with Greek yogurt and lemon juice. Scalp feels pretty much all better, and my hair feels soft and silky!
  • Day 4 (Thursday) - Dry shampoo (cornstarch and cocoa powder) to absorb excess oil. (Although in hindsight, the dry shampoo was unnecessary.)
  • Day 5 (Friday) - Scalp is getting a bit itchy, but hair looks great!
  • Day 6 (Saturday) - Second honey treatment for itchiness. Irritation is completely gone! Laying off the dry shampoo for a while, unless I absolutely need it.
  • Day 7 (Sunday) - Hair still looks great!
  • Day 8 (Monday, again) -
    Before Water Only shower: My hair still looks good enough to go in public, but there is a little oil on my roots.
    After Water Only shower: All it took was "scrubbing" my scalp and hair to break up the oils and distribute them a bit, along with a boar bristle brush after it dried.
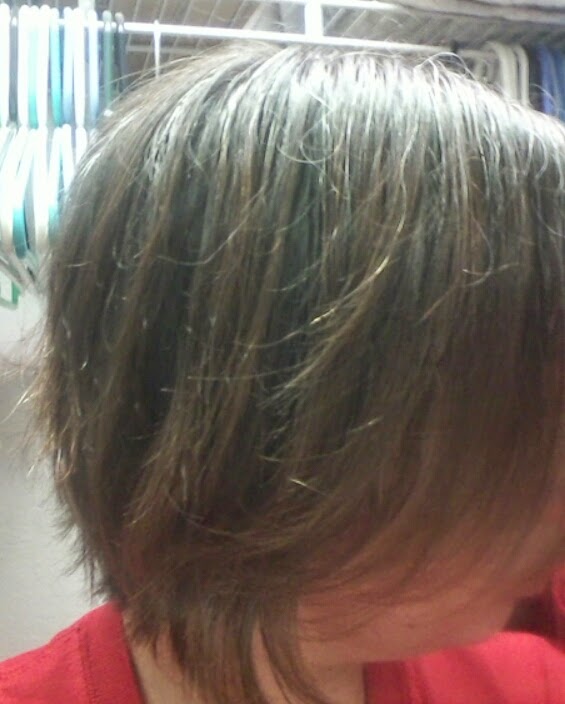

Day 5
Day 7


 These pictures are from Day 8 before my water only wash. A bit oily at the top, but still looking great!

This picture is from Day 8 after my water only wash, and a thorough brushing with my new boar bristle brush! These natural brushes are great for distributing sebum, so that all of the oil isn't sitting at your roots.

So basically, I "wash" my hair every few days with RAW honey (the raw part is really important guys! A lot of commercially produced honey is processed with corn syrup. No good, y'all...), rinse it thoroughly with warm water, and then do an apple cider vinegar rinse. For the rinse, I simply use about 1 part apple cider vinegar to 3 parts water. I mix it ahead of time, add it to a dollar store spray bottle, and keep it in the shower to use as needed. When using this rinse, I spray it into my scalp and massage it in, working it (and the sebum) through the length of my hair - which isn't much right now. Most ratio mixes I read were 1 part vinegar to 1 part water, but after trying it I felt this was too strong for me. If you're just trying this, start with a 1:4 ratio to be safe. Experiment to find the right ratio for your hair. Too much vinegar can dry out your hair. Also don't worry about the smell; you won't smell like pickles, I promise! Rinsing well will help, but the smell goes away as it dries. Occasionally, if I get sweaty I'll notice a faint vinegar smell, but it's not unpleasant. No complaints from anybody so far!
On days that I don't "wash" my hair with honey, I go the water only route. On days that I shower, that is. No, I don't shower everyday. (I'm a hippy, remember?) I promise I still smell good, and my boyfriend can attest to that! Besides, I don't wanna ruin all this hard work (or lack thereof?) by getting rid of too much sebum and drying my hair out. Then the oiliness cycle would start all over again! If you're the kind of person who absolutely must take a shower everyday, then I suppose a shower cap would suffice. When I wash with water only I scrub my scalp, just like when I used commercial shampoo, under the running water, making sure to work the sebum through the lengths of my hair. If your hair is too thick or course to run you fingers through, you could always use a bit of the vinegar rinse to "condition" it.
I just let my hair dry naturally now, and brush it when it's dry with my boar bristle brush. I'm actually trying to space out my honey washes gradually, since the honey does removes a bit of sebum, and the whole point of the no poo thing is to wash your hair less often. I will keep you guys updated as time goes on!

Unexpected Benefits of No Poo:

While I entered this journey hoping to get rid of my scalp irritation (Success!) and use less toxins, there were a few happy surprises along the way!
  • I've had painful cysts behind my ears since I was a young adult. I'm happy to say that they've completely disappeared in a week!
  • I've also regained some texture and life to my hair! Before I got pregnant with my son six years ago, I could scrunch my hair easily. However after his birth, my hair wouldn't hold a curl or scrunch no matter how much or little product I used.
  • My acne has cleared up! Albeit I still have a pimple here or there, but I haven't had a bad breakout in a while! My idea of a bad breakout is a large cluster of pimples that are close together. This could also be attributed to the occasional Greek yogurt/honey face mask that I make though. One more reason to LOVE honey!

Transition

So 8 days with no shampoo, and I don't look like a grease ball at all! Not everybody has an easy transition like I have so far though. I've heard a lot of stories about transition lasting anywhere from a week or two, up to a few months and beyond. What is "transition," you ask? It's the period when your hair is adjusting to it's own sebum production. Why does this happen? If you've ever breastfed, then this analogy will be helpful: The more your baby nurses, the more milk you produce. Same with your scalp and shampoo; the more you strip your hair of sebum with harsh shampoos, the more your scalp will produce. And what happens when baby is weaned from breastfeeding? You get engorged at first with all of the milk your baby isn't drinking, but your body produces less with time. When you quit shampooing, your scalp is still producing the same amount of oil but your shampoo isn't stripping it anymore - and this can leave you with very oily hair. During transition, your scalp will gradually produce less sebum, resulting in beautiful, natural hair!

Tips/Theories on my easy Transition:

  • For starters, I'd been using a vinegar rinse on my hair after commercial shampoo for a few months before I went no poo. This helped me to stretch my washes out, by a day or two at most, before my hair got too greasy to go into public. Perhaps the fact that I was sort of stretching out my washes already made it easier to transition.
    For more info on apple cider vinegar rinses, check out this link: Make Your Own Natural Vinegar Hair Rinse
  • I have very short hair (which I love), as you can see from the pictures above. I feel that having short hair allowed me to distribute the sebum easier than somebody who has medium to longer hair - it has less of a trip to make from root to tip!
  • The boar bristle brush I bought (you can find them I most stores fairly inexpensive) a few days ago, made a lot of difference regarding the oil sitting at my roots. Plastic bristle and combs just weren't helping move the oil through my hair. Some prefer to preen (using your fingers or palms to slide the oil along the hair), but I just don't have time for that. I learned from my Facebook group to only brush with a boar bristle brush when the hair is dry or it could cause tearing and damage if done while wet. I'm also trying to just brush with the boar bristle brush at night and "finger comb" or use a wide-tooth comb the rest of the time.
Please keep in mind that all of these theories are based on my experience and my unique hair. Just because it works for me does not mean it'll work for you. A lot of no poo is trial and error until you find the right routine for you - there is no one size fits all.

Does this sound like something you'd be willing to try, or have tried? If so, please share your questions, comments, and experiences with me! Good luck guys!

Read about the rest of my journey here: Going No Poo