Monday, January 26, 2015

Minimize the Mess


I've been a bit out of sorts lately. I've been behind on my school work, and on my blog posts! It took me a while to figure out it was ugly house syndrome. Have you ever experienced it? Sometimes an untidy or unorganized home can leave one feeling a bit sluggish, or even depressed. In my case, we have a tiny apartment yet we've accumulated a lot of stuff junk. So much, in fact, that some of it was just sitting in boxes, taking up our living room! What is the point in having so much stuff, if it just becomes an eyesore that doesn't even get used?

min·i·mal·ism

What is minimalism? The basic concept is "less is more!" We live in a consumer-driven society, and many of us (myself included) feel obligated to buy something just because it's cheap or on sale. There is a lot of confusion between needs and wants these days. For example, do we need 20 plates in a three-person family? Does my significant other need that new Nerf gun to add to his already huge collection? Does my son need that new toy he sees in the store? No, no, and no! Those are all wants.

While this journey is still ongoing, it all started when I discovered a minimalist group on Facebook. I was so inspired by everybody's posts and beautiful photos that I immediately began sorting through our "stuff" to determine what was a need and what was a want.


Make a Plan

The first thing I did was take a look at the apartment and determine the "catch-all" areas and problem spots. In my household, these included the kitchen table, the coffee table, and the kitchen counters... basically any flat surface. One of the worst spots in the house, other than those already mentioned, was my 5 year old son's room; therefore his room was the first to get "purged." Goodness, that kid has too many toys. So far it's the only room completely done, so I'll give y'all the breakdown of the plan for his room.

The Plan

  • Go through EVERYTHING!
  • Determine what needs to be purged. Has it been played with in the last 6 months? Are there multiples of the same item (3 Spiderman action figures, for example)?
  • Sort into 4 different categories: Sell, Donate, Trash, and Keep.
  • Don't get ahead of yourself and get rid of something you actually need. If there is something you're unsure about, try putting it in a "test box" that is out of sight. If you can make it a predetermined amount of time without using it, then get rid of the item. 
  • Don't expect to be done overnight. This is an ongoing journey for us, happening a little bit at a time. 


Purging 

No, I wasn't out on the one night a year that all crime is legal. Purging, in the minimalist community, refers to getting rid of all of the unused, unneeded things, so you can get down to the items you really need, love, and appreciate.

Before the purge, my son's room always looked like it had just been hit by a hurricane. It didn't matter if there were toy boxes, he dumped all of the toys on the floor. To escape the mess, he often dragged toys out into the living room to play with them, and that only lead to more clutter. He still has a lot of toys put up in the closet, but he now has no more than 20 toys in his room. Cleanup time is no problem for him now, as opposed to before. Does "I need help! I can't do it by myself!" sound familiar?

These are the toys purged from my son's room. Now imagine them spread all over the floor.

Other than my son's room, I've also gotten around to the never-ending dishes. After going through all of the plates, silverware, and cups, I've gotten it down to enough for five people. That's more than enough for a family of three, considering we use paper plates and utensils when we have guests and my son has his own kid-friendly dinnerware.

My current project is reducing a stack of my son's artwork (about a foot high) by scanning most of it, and only keeping hard copies of extremely special projects. Now we'll have all of it saved digitally, without the clutter of stacks of paper or a dozen three-ring-binders taking up space! You could save them to your computer or another device, but I saved them to Dropbox (download it here!). IT's a "cloud" type service, meaning I can access them from anywhere.

Screenshot of Dropbox. Click here to download it!


Benefits of Minimalism

  • Less stuff = less mess. Let's be honest... there are only so many ways to organize. Do I really want need 10 different boxes of toys taking up space in the closet? Rotating toys works for some families, but not this one. Same with the dishes I mentioned already. The more dishes there are, the more I have to wash. I can say, without a doubt, that cleanup (in the kitchen and my son's room) has been a breeze since.
  • Discovering what's really important. How can we truly appreciate what we have, when most of it is just taking up space? Going through everything gave me a chance to judge what was really meaningful, and what was just in the way. Going through artwork especially brought back some valuable memories and allowed me to reminisce about my son's younger days. 
  • It honestly just looks nicer. Although our home is not even close to being completely done, I know it will look more open and inviting than it did packed to the gills with stuff.


I will definitely keep y'all updated as this project goes on. I'll remember to take some "before" pictures for the next post as well!

Sunday, January 18, 2015

Double-Duty Orange-Infused Vinegar: Hair Rinse & Household Cleaner!


This post was originally inspired by a Facebook post (click here to see it).

I've mentioned before that I love double-duty DIY products! Reusing tea bags and leftover coffee for conditioning hair rinses, and old coffee grounds as a facial scrub are just some examples. Well, I was peeling a mandarin orange for my son one day and I thought, "These smell too delicious to just throw down the garbage disposal!" (Although, that is one way to repurpose orange peels and freshen up your disposal. Can you say "double-duty?") I then remembered that my mom had shared a post to my Facebook page about soaking orange peels in vinegar for 2 weeks to create your own orange-infused vinegar! I had everything I needed, so I went ahead and tried it.

Basic Concept:

The instructions for this project were quite simple: fill a jar with orange peels, cover the orange peels with vinegar, and let them soak for 2 weeks.

I actually made two different batches. I decided to add rosemary and a cinnamon stick to one jar, because of their benefits to hair. A week later, and one sniff, let me know that the cinnamon/rosemary one will only be for cleaning! The cinnamon smell was so strong I wouldn't even dream of trying it on my scalp. Some folks actually experience a burning sensation with cinnamon, so I didn't want to risk it - especially considering how strongly it smelled. Thankfully, I had made one normal batch that could still be used for my hair.


Straining the Vinegar:

Strain the vinegar before using it (trust me, the rosemary and orange peels will clog your spray bottle). Simply place a strainer over a bowl or measuring glass, and pour the orange-infused vinegar into the strainer. You may need a fork to get all of the orange pieces out. I suggest letting them sit for awhile so that the excess vinegar can drip down.

I only took pictures while straining the vinegar with the orange peels.


The final product is orange-colored.
Save the orange peels and use them again!


For Cleaning:

If you're using your orange-infused vinegar for cleaning, like the rosemary/cinnamon one I created, then you only need to dilute it to  50% with water. Mine smelled incredibly strong because I used a whole stick of cinnamon (too much, by the way), so my ratio was more like 3 parts water to 1 part vinegar. I seriously recommend using a very small amount of cinnamon or just leaving it out all together.  Nobody in my household was a big fan. However, it was pretty great at removing hard water stains.

Add it to a spray bottle or squirt bottle to make cleaning easier.


For Hair:

If you've read any of my Going No Poo post, you might know that I'm a big fan of using apple cider vinegar as a conditioner. This orange-infused vinegar (you can use white vinegar or ACV) can also be used on hair! Dilute it to your preferred vinegar rinse solution. If you're a first-timer, you should start with 1 or 2 tablespoons of the orange-infused vinegar per 1 cup of water. The orange peels are great at removing excess oil, so you definitely don't want to overdo and remove too much of your natural sebum.


After You're Done:

Don't toss those orange peels yet! You can use the same orange peels and repeat the process all over again! I've only reused them once so far, but I'll definitely try it again after the second batch is done.


My Experience:

I absolutely loved the orange-infused vinegar! The orange, rosemary, and cinnamon one... not so much. It came in handy when the newest fur baby in our house had an accident on the carpet though - it definitely covered up the urine smell. Adding the cinnamon was a fail, in my opinion, but there was no way I was going to let it go to waste.


Sunday, January 11, 2015

Going No Poo - Week 9 (& Honey/Coconut Oil Mask for Dry Scalp)


How is everybody fairing during these winter months? This back-and-fourth, Florida weather is driving me a bit crazy. I know I should't complain, because some people are in the teens and twenties! It just bothers me that Florida can't make up it's mind. Seriously, how can it be 90 degrees one day and 60 degrees the next? Okay, I'm done complaining...

With the winter months comes dry scalp for a lot of people. It even got me this winter, here in Florida! I did another Moisturizing Honey Mask to soothe my dry, irritated scalp, but this one was just a bit different from my last one.

For this mask I used only 3 ingredients: honey, water, and coconut oil.


Honey/Coconut Oil Mask for Dry Scalp


  • 2 Tbsp Raw Honey
  • 1 Tbsp Water
  • 1/8 tsp Coconut Oil

Directions


  1. Mix all the ingredients together. 
  2. Apply the mask to the scalp, and work through to the ends of the hair. You may need to double the recipe if you have long hair. Using a squirt bottle (like a hair dye applicator) makes the process a lot easier, as does standing over the sink. 
  3. Wrap hair with an old, clean T-shirt or a shower cap, and leave the mask on for at least 30 minutes. The longer you leave it on, the better it soothes and heals scalp irritation. 
  4. Rinse with water. You can follow up with an apple cider vinegar (ACV) rinse if you'd like, but it's completely optional.


Success! This Mask did exactly what it was meant to do: soothed and
healed my scalp irritation without leaving my hair oily.


What else is new this week?

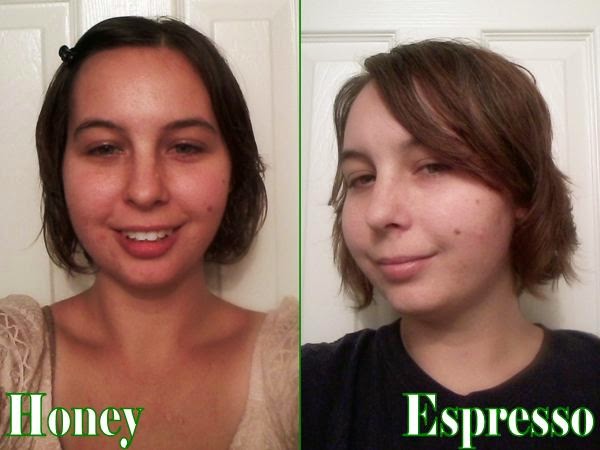
I finally got around to trying a hibiscus tea rinse! You may remember me mentioning hibiscus tea in my post about Herbal Tea Rinses. In case you don't, it is great for auburn/red hair and for bringing out natural red tones. I don't really have auburn hair anymore, but part of me hopped for reddish tones after using it. There haven't been any noticeable changes after 2 applications, although it does smell great! I'm still using my espresso rinses as well - in fact, I even mixed it with the hibiscus tea to produce a darker red.


Good "hair days" are a lot more common these days than they used to be. Even my bad hair days aren't really that bad. For comparison, I've posted a picture of the best hair day I've had this week along with a picture of the worst. Even at my worst, I didn't feel gross or greasy. I even went out with a friend... in public! *gasp*


To read about the rest of my journey, click here:

Sunday, January 4, 2015

Going No Poo - Week 8 (Children & No Poo)


It's been 2 months since I've used commercial shampoo! I love to bring it up in conversation, and watch the expression on people's faces go from disgust to curiosity, and then to amazement at the fact that my hair looks, feels, and smells clean (yes, I do encourage touching and smelling).

I'm still using an espresso rinse, usually with some whey and rosemary/ginger herbal tea mixed in. I sometimes add a drizzle of honey as well. Right now I'm rinsing every other day. I may try experimenting with some other rinses soon, but for now I'm happy with my current routine!


Children & No Poo

My 5 year old son has been No Poo for about as long as I have, give or take a week. He's pretty much water only (WO), with an occasional apple juice rinse. That's the only thing he'll let me put on his head other than water, but he's come to love it - and even request it! It might have something to do with me allowing him to squirt the leftovers in his mouth and drink it after...


Look at his beautiful, shiny hair and healthy scalp!

If you're a parent already, you may know that washing a child's hair everyday is completely unnecessary, and can actually dry their scalp out. Before making the switch to No Poo myself, I was only washing my 5 year old's hair about once a week. After I stopped using all those yucky, chemical-laden shampoos on my hair, how could I go and slather it on his head? That's when we decided to ditch the 'poo for him as well! 

He has short hair and he doesn't sweat very much yet, so WO was the route we went with him. His short hair and healthy scalp made the switch a breeze; he didn't even go through any transition! 

I'd never force him to put anything on his hair that he didn't want to, so I started making suggestions about possible rinses we could use on him. Apple juice came up and he liked the sound of it! He really doesn't need the apple juice for his hair... it's more of a special treat for him. We dilute it to a ratio of 1 part apple juice to 1 part warm water (warm or room temperature water feels better going on than cold).


Why Apple Juice?

While raw apple juice is ideal, we simply used the processed stuff because it's all we had. Bonus points if you own a juicer and can extract the juice from your own apples!

  • Dandruff remedy - although my son doesn't have any dandruff problems, apple juice does contain malic acid and amylase, which help to exfoliate and remove dead skin and dandruff flakes (Source: hair buddha).
  • Soft, lustrous hair - much like apple cider vinegar (ACV), the acidity of apple juice helps remove product buildup and residue, helps distribute the sebum down the length of the hair shaft, and closes the cuticle (leaving hair shinier). 
  • Balances & maintains pH - the natural pH of the scalp is between 4.5 and 5.5 (which is acidic) and the pH of apple juice is between 3.3 and 4. Since the apple juice pH is so similar to our scalp (as opposed to commercial shampoos), it helps to maintain the natural acidic pH which hinders the growth of bacteria and fungus (Source: hair buddha & pH Values of Common Foods and Ingredients).


Benefits of No Poo

  • Softer hair - my son's hair is now unbelievably soft and silky. I honestly can't help myself sometimes... I love to touch and smell his hair.
  • Clear scalp - I didn't even realize that scalp irritation was a problem for my son until the switch. He'd never let me run my fingers through his hair before; he always said "ouchy," but I figured he just didn't want Mommy touching his hair. Since giving up shampoo, touching his scalp or hair isn't a problem. The first time he let me touch it without protesting I asked him if touching his head hurt anymore, and thankfully the answer was no. He loves his hair touched and scalp rubbed now!


Happy New Year from the No Poo Hippy Family!


To read about the rest of my journey, click here:
Going No Poo

Monday, December 29, 2014

DIY Coffee Facial Scrub!


In the post Going No Poo - Week 5, I discussed using a coffee rinse in my hair that turned out wonderfully! You may have noticed a picture of me with an espresso mask/scrub on my face that sort of looked like mud. Yep, here it is:


Well, it's not mud. I was inspired to try coffee grounds (or espresso, in my case) the same night that I tried my lustrous espresso rinse! If I can repurpose the extra coffee into a (basically) free, conditioning rinse, why not use the grounds too? I've come across a few mentions of using coffee grounds for a facial scrub on Pinterest and Facebook, and I happen to have some fresh grounds on hand last night after brewing some espresso (to drink and for my hair)... plus I love to experiment with free, DIY beauty treatment! *This Scrub can also be used on those pesky rough elbows and feet!*


What Ingredients Did I Use?


All it took was 3 simple ingredients, which are quite common in my household:
  • Coffee Grounds - I used espresso grounds for my scrub, but they are basically interchangeable for this purpose. You can use either fresh or used grounds, so why not get more bang for your buck, and reuse grounds you've already brewed? The coffee grounds work as an exfoliate, while the caffeine has anti-inflammatory properties that reduce redness and inflammation. It also temporarily reduces the appearance of cellulite! Who knew you could get cellulite on your face? Not me. (Source: LIVESTRONG.COM)
  • Honey - Some of you may know that I have a love-affair with honey, and that's okay with me. Honey is an antiseptic, therefore it prevents the growth of the bacteria in your pores, and disinfects your skin. In fact, if honey is applied to a fully developed pimple or whitehead, it can stop the infection in your pore from worsening (Source: Honey and Acne). Honey also has anti-inflammatory properties, which reduce swelling and redness that can accompany pimples. Finally, honey is a humectant which preserves the moisture in your skin and draws moisture from the air, which leaves your face moisturized without feeling oily.
  • Lemon Juice - Lemon helps to lighten the skin and even complexion, while the citric acid exfoliates. Since lemon juice is an astringent, it also dries the blemishes. *Since it can be drying, it's important not to add too much lemon juice, especially if you have dry skin.*
This may not be the prettiest mask in the world, but I personally love the smell!


Directions

I love the ease of this scrub! Simply mix together the ingredients in a small container, and apply to the face with clean hands or a clean makeup brush. Leave the scrub on your face for about 2 minutes, or longer if you like. Rinse over the sink or in the shower and gently rub the scrub off in circular motions . Pat your face dry with a clean towel.


You can easily make this scrub into a mask: simply add 1/2 Tbsp of Greek yogurt, and leave it on until it dries!


Some people have mentioned having an adverse reaction to honey and/or lemon juice, so be sure to test this recipe (as well as any other) on the inside of your wrist. If you feel any stinging or burning, wash it off immediately and DO NOT use it on your face.

Saturday, December 27, 2014

Going No Poo - Weeks 6 & 7


I've been pretty busy with the 7 Days of Christmas, so I was pretty late getting to Week 6. The week was already almost over by the time I got any free time, so I figured I'd just combine Weeks 6 & 7.


Giving Up Honey

I seriously LOVE honey. I love it! Have I said that enough yet? Despite my love-affair with honey, I actually haven't washed with it since Week 4 (well, maybe a drizzle in my rinses here and there). It doesn't mean that I don't love honey anymore (I swear, I do!), it was just time to switch things up! I felt like my hair was getting too weighted down, and I also felt like I could stretch out the days between washes a bit more. I decided to finally try out an espresso rinse in Week 5, and LOVED it!

Can you see the difference in body? The espresso enhances my curls as well!


I did use a honey mask after a failed experiment left me with some scalp irritation. Read Trial & Error below for more details.


What Am I Using Now?

Since I recently made some homemade yogurt, I had plenty of whey leftover (a byproduct of yogurt). I tried a whey rinse back before I made the switch to No Poo, and I loved it then. I had espresso, I had whey, and somehow they ended up together in my hair. It was awesome, and the smell was delicious! My favorite part was that it was the closest to a lather I've gotten since going No Poo! The whey has a bit of a thickness to it, and that's what sort of feels like it's lathering up. I've also been experimenting with adding a ginger/rosemary tea to the mix (simply ginger and rosemary boiled in water and steeped for about 20 minutes). I usually leave it in for a while, but it works pretty well as a quick rinse too. This is just a personal preference, but I like to apply the espresso/whey mixture over the kitchen sink, then wrap my hair in an old, clean T-shirt and allow it to dry before rinsing it out with water.

Acid rinses (like apple cider vinegar, certain teas, and coffee) are not technically washes; they're considered a conditioner, so you can use them daily if your hair responds well to it.


Since the Switch

Since I've quit using a honey wash every week, and have switched to acid only (AO) rinses (espresso and whey, specifically), my hair has had so much more body! My hair loves espresso! I usually do them every other day, but they are fine to daily as well.


Trial & Error

One thing I sometimes miss about shampoo is the smell. My hair doesn't smell bad at all; it just doesn't have a smell. Sometimes I miss that freshly shampoo'd smell (think flowers or fruit), although not enough to actually use any. I decided to try a little scent experiment with vanilla extract. I don't have any EOs (essential oils, for you EO virgins like me), but I have seen vanilla extract in some DIY recipes (for lotion or soap perhaps). Well for those of you who don't know, most vanilla extracts are made with alcohol and sugar or corn syrup. Although alcohol is found in many commercial shampoos (why?), it's extremely drying. After going this long without commercial shampoo, even 10 drops of vanilla extract was enough to inflame the scalp irritation that going no poo helped get rid of. The irritation was bad enough for me to use a honey mask the next day, which helped immensely. Lesson learned: don't use vanilla extract on my hair.

Some people like to leave their conditioning rinses in, and I though it would be great to try with espresso! Wrong. It left brown marks on my hands anytime I ran my fingers through my hair. It also left my hair feeling a bit stiff... I'm not sure that's the right way to describe it, but I can't think of a better word for how my hair felt. I'm going to stick with rinsing the espresso out. 


Unexpected Benefits of Going No Poo


  • Stronger nails - since giving up shampoo I've noticed that my nails have gotten stronger, but especially since using my orange/rosemary herbal tea rinse on my hair; just the act of rubbing it into my scalp was enough to strengthen them. I wish I had a before and after picture to show you. My nails usually break off right above the pink, but in the last few weeks, they've gotten unbelievably strong! Since I don't use the herbal tea rinse anymore, I'd like to incorporate it into a nail care routine. 
  • New hair growth - believe it or not, those little hairs I circled below are actually new growth! I attribute it to the rosemary in the rinses I've been using (rosemary is great at strengthening hair and even promoting new growth), along with the fact that I haven't been using any harsh chemicals on my hair or scalp!
    I'm sure these little hairs are new growth and not breakage for a few reasons:
    1) I haven't been doing anything to cause split ends (tying my hair up, using harsh chemicals, brushing too hard and/or too often).
    2) I examined them to make sure there were no frayed or stressed ends. 

For more information on breakage and new growth, check out Hairfinder.com.


The most important thing I've learned from all of this is to experiment! Every wash or rinse you try won't work for you, but when you come across what does work for your hair you'll be over the moon. I thought I had found what worked for me with honey, but if I didn't experiment with new wash methods I wouldn't have found this better working one!


To read about the rest of my journey, click here: 

Wednesday, December 24, 2014

7 Days of Christmas: Day 7 - Cookies & Hot Chocolate for Santa (Bonus: Track Santa's Journey)


If you're in need of some easy last minute cookie recipes for Santa, look no further.

Peanut Butter Blossoms

While it's not the healthiest, one of my go-to recipes in the past were peanut butter blossoms. It was always a favorite, so I never rocked the boat by trying to tweak it or make it healthier. The peanut butter recipe was actually on a Jif peanut butter container (check it out here). For peanut butter blossoms, all you have to do is add a Hershey's Kiss immediately after taking them out of the oven.

Click here to get the recipe!


Cookie Bars

After reading some blog posts about how to use up Halloween candy back in October, I stumbled upon a cookie bar recipe that was actually from scratch! I love it because you can use whatever candy you have on hand (or pick red and green candies for Christmas!). This is the perfect recipe to use up any half full bags of chocolate chips or candy you might still have left over from Halloween (believe it or not, we do). Get the recipe here!

Click here to get the recipe!


Hot Chocolate Recipe

Sometimes Santa gets bored of plain old milk with his cookies... and by Santa, I mean me. Why not switch it up this year with an easy hot chocolate recipe? Don't forget the marshmallows! Try some of these easy and awesome recipes!


My son wants to leave out hot chocolate and eggnog, as well as a note asking which Santa prefers. That's totally fine with me, because Daddy likes eggnog and Mommy likes hot chocolate!


Track Santa's Journey!

Find out where Santa is right now with Google Santa Tracker! You and your children can see where he is, and what his next stop will be! Check it out here!


Happy Holidays to everybody! Don't get so wrapped up with everything that you forget to enjoy yourself!